Formatting a USB drive as FAT32 or exFAT is straightforward. It helps ensure compatibility across different devices.
USB drives are essential tools for storing and transferring data. But formatting them correctly is key. Choosing the right file system, like FAT32 or exFAT, depends on your needs. FAT32 is widely used and works with most devices. However, it has a file size limit.
ExFAT, on the other hand, supports larger files and is ideal for modern devices. In this guide, we will walk you through the steps to format your USB drive as FAT32 or exFAT. This will ensure your drive works smoothly with various gadgets and systems. Ready to get started? Let’s dive in!

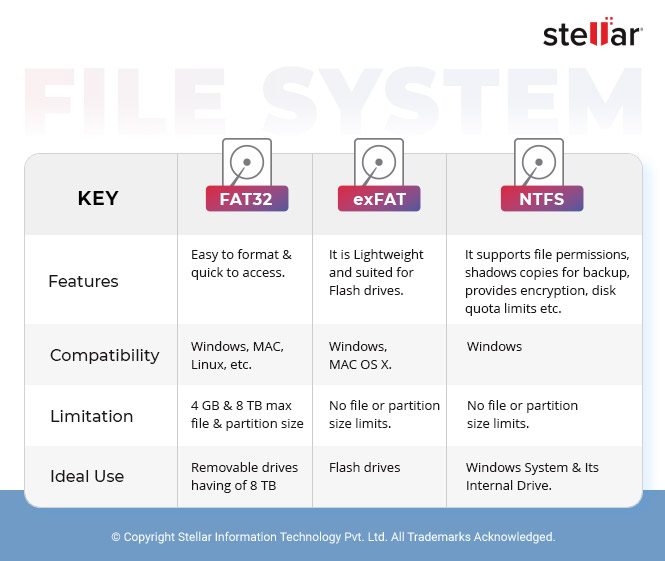
Credit: www.stellarinfo.com
Table of Contents
ToggleChoosing The Right File System
Format your USB drive as FAT32 for better compatibility with older systems. Choose exFAT for handling larger files efficiently.
Choosing the right file system for your USB drive can be a crucial decision. It impacts compatibility, performance, and even the longevity of your data. Whether you’re formatting your USB drive for a specific use or general storage, understanding the differences between FAT32 and exFAT is essential.Differences Between Fat32 And Exfat
FAT32 has been around for a long time. It’s widely compatible with almost all operating systems, making it a safe bet for general use. exFAT is a newer file system. It was designed to handle large files and bigger storage devices more efficiently. While FAT32 has a file size limit of 4GB, exFAT supports much larger files. This makes exFAT ideal for modern applications, like video editing or large backups.Benefits Of Each File System
FAT32 Benefits: – Compatibility: FAT32 is universally supported across all major operating systems, including Windows, macOS, and Linux. – Reliability: It’s a tried-and-true system, less prone to corruption and errors. exFAT Benefits: – File Size Support: Handles files larger than 4GB, which is great for HD videos and large software. – Performance: Generally faster for read/write operations, especially on larger drives. Choosing between FAT32 and exFAT depends on your needs. If you need a file system that works almost everywhere, go with FAT32. If you require handling large files, exFAT is your best bet. Have you ever tried transferring a large video file and hit the FAT32 limit? Or maybe you’ve formatted a USB drive without considering the best file system? Share your experiences and let’s see which system works best for you.Preparing The Usb Drive
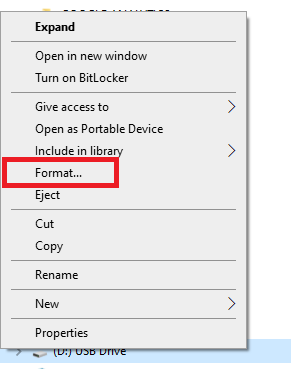
Formatting a USB drive as FAT32 or exFAT ensures compatibility with most devices. Simply connect the USB drive, right-click, choose “Format,” and select either FAT32 or exFAT from the file system options. This process prepares the drive for use with various operating systems.
Preparing the USB Drive Getting your USB drive ready for formatting is crucial. It’s not just about plugging it in and clicking a few buttons. There are some steps you need to follow to ensure everything goes smoothly. Let’s dive into the preparation process.Backup Important Data
Before you do anything, make sure to back up your important data. Formatting a USB drive will erase all the data on it. You don’t want to lose any valuable files. Transfer your documents, photos, and videos to another storage device or to cloud storage. If you’ve ever lost data before, you know how frustrating it can be. Don’t skip this step. Take a few minutes to safeguard your information.Check Drive Compatibility
Not all USB drives are the same. You need to check if your drive is compatible with FAT32 or exFAT. Most modern drives support these formats, but it’s always good to double-check. Look at the drive’s specifications. If you’re unsure, try formatting a small section first. This will help you avoid potential issues later. Are you planning to use the USB drive on multiple devices? Make sure all your devices support the format you choose. Compatibility can save you from a lot of headaches. — Preparing your USB drive is an essential step in the formatting process. By backing up your data and checking compatibility, you ensure a smooth transition. Have you backed up your files and checked your drive’s specifications? If not, now is the time to do it.Formatting On Windows
Formatting a USB drive on Windows is simple. You can choose between FAT32 and exFAT formats. FAT32 is compatible with many devices. exFAT supports larger files and is faster. Let’s explore two methods to format your USB drive.
Using File Explorer
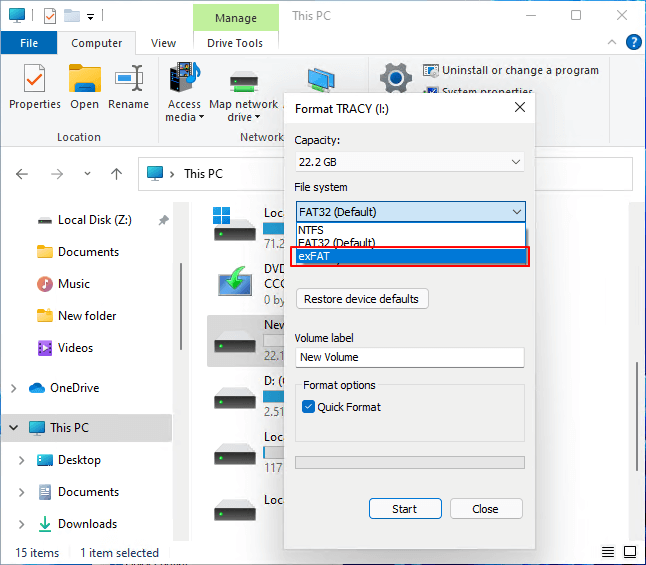
Open File Explorer on your computer. Insert your USB drive into a USB port. Find your USB drive in the list of drives. Right-click on the drive and select “Format.” A new window will appear. Choose either FAT32 or exFAT from the “File system” dropdown menu. You can also name your drive in the “Volume label” field. Click “Start” to begin the formatting process. Wait for the process to complete. Click “OK” when done.
Using Disk Management
Press Win + X on your keyboard. Select “Disk Management” from the menu. A new window will open. Find your USB drive in the list of drives. Right-click on your USB drive and select “Format.” A new window will appear. Choose either FAT32 or exFAT from the “File system” dropdown menu. You can also name your drive in the “Volume label” field. Click “OK” to begin the formatting process. Wait for the process to complete. Click “OK” when done.

Credit: slingshot.polaris.com
Formatting On Mac
Formatting a USB drive on a Mac can be simple and straightforward. Whether you need the drive to be FAT32 or exFAT, the process is quite user-friendly. I remember the first time I had to format a USB drive; it seemed daunting until I discovered the built-in tools on my Mac. Let’s walk through the steps together.
Using Disk Utility
Disk Utility is your go-to tool for formatting drives on Mac. You can find it in the Applications folder under Utilities. Open it up and you’ll see a list of all connected drives.
Click on your USB drive from the list. It will bring up details about the drive. Make sure you select the correct one to avoid formatting the wrong drive.
Next, click the “Erase” button at the top. This is where the magic happens. But before you proceed, let’s set the file system.
Setting The File System
In the Erase dialog, you’ll see a dropdown labeled “Format”. Here, you can choose between FAT32 and exFAT. FAT32 is great for compatibility with older devices, while exFAT supports larger files and is compatible with modern systems.
Select the file system that suits your needs. If you’re unsure, think about where you’ll be using the USB drive most frequently. For example, exFAT is often better for video files due to its larger file size support.
After choosing the format, give your drive a name. This is optional, but naming your drive can help keep things organized. Then, click “Erase” to start the formatting process.
It’s that simple. Formatting your USB drive on a Mac doesn’t have to be a headache. Have you had any interesting experiences while formatting drives? Share them in the comments below!
Formatting On Linux
Formatting a USB drive on Linux can seem daunting, but it’s quite simple. Whether you choose FAT32 or exFAT, Linux has tools to help. Formatting prepares your drive for storing files. It also helps to remove any existing data.
Using Gparted
GParted is a graphical tool for managing disk partitions. First, install GParted via your package manager. For example, use the terminal command sudo apt-get install gparted on Debian-based systems. Open GParted from your applications menu. It will prompt you for your password. Enter it to proceed.
Plug in your USB drive. GParted will list your drives. Select the USB drive from the list. Ensure you select the correct drive to avoid data loss. Right-click on the drive and choose “Format to”. Select FAT32 or exFAT from the options. Click “Apply” to start formatting. GParted will take a few moments to complete.
Command Line Methods
The command line offers a more direct way to format USB drives. First, identify your USB drive with lsblk or fdisk -l. Look for a device name like /dev/sdb. Double-check to avoid selecting the wrong drive.
To format as FAT32, use the mkfs.vfat command. Type sudo mkfs.vfat -F 32 /dev/sdX1, replacing sdX1 with your USB drive’s identifier. For exFAT, use the mkfs.exfat command. Type sudo mkfs.exfat /dev/sdX1. Wait a few moments for the process to finish.
Once done, your USB drive is ready to use. Safely eject it from your system. Enjoy your newly formatted drive!
Troubleshooting Common Issues
Formatting a USB drive as FAT32 or exFAT can sometimes present challenges. Users may face several issues during this process. Understanding and addressing these common issues will ensure a smoother experience. Let’s explore some of the typical problems and their solutions.
Drive Not Detected
A common issue is the drive not being detected by the computer. First, check if the USB drive is properly connected. Try plugging it into another USB port. If the drive still isn’t recognized, test it on another computer. This helps determine if the issue is with the drive or the computer.
Update the USB drivers on your computer. Outdated drivers can prevent the drive from being detected. To update drivers, go to Device Manager, find the USB drive, right-click, and select Update Driver. Restart the computer after updating.
If the drive is still not detected, it may be faulty. Consider replacing it with a new one.
Formatting Errors
Formatting errors can occur for various reasons. Ensure the USB drive is not write-protected. If it is, you cannot format it. Check the drive for a physical switch that enables write protection. If found, switch it off.
Try using different formatting tools. If the default formatting tool fails, third-party software may help. Some popular options include Rufus and EaseUS Partition Master.
Check the drive for errors using the Check Disk utility. Open Command Prompt and type chkdsk X: /f, replacing X with your drive letter. This will scan and fix errors on the drive.
Formatting errors can also be due to corrupted sectors. If the drive has bad sectors, consider replacing it. Bad sectors can lead to data loss and other issues.
Best Practices
Maintaining the health and efficiency of your USB drive is vital. Following best practices ensures your data stays safe and the drive functions well. Here are some key practices to consider.
Regular Backups
Regularly back up your data stored on the USB drive. This helps prevent data loss if the drive fails. Use cloud storage or an external hard drive for backups. Schedule backups weekly or monthly based on your usage.
Safely Ejecting The Drive
Always safely eject your USB drive before removing it from the computer. This prevents data corruption and keeps your files intact. Click on the ‘Safely Remove Hardware’ icon on your taskbar. Wait for the notification confirming it is safe to remove the drive.
Advanced Tips
Formatting a USB drive as FAT32 or exFAT can optimize compatibility with various devices. These file systems support larger files and improve performance. Follow these advanced tips for a seamless formatting process.
### Advanced Tips Getting your USB drive formatted as FAT32 or exFAT is a straightforward process. But sometimes, basic formatting might not be enough. You might need to partition the drive or use specialized tools. These advanced tips can help you get the most out of your USB drive.Partitioning The Drive
Partitioning your USB drive can help you organize your data better. Think of it as creating different sections within your USB drive, each with its own formatting. To partition your drive, use a tool like Disk Management on Windows or Disk Utility on Mac. Simply right-click on the USB drive and choose the option to partition. You can create multiple partitions and format each one as FAT32 or exFAT. Partitioning is especially useful if you want to separate your work files from personal files. It’s like having multiple USB drives in one.Using Third-party Tools
Sometimes the built-in tools on your computer may not be enough. That’s where third-party tools come in handy. Software like MiniTool Partition Wizard or EaseUS Partition Master offers advanced options. These tools can help you format larger drives as FAT32, which the built-in tools might not support. They also provide features like data recovery and error checking. It’s like having a Swiss Army knife for your USB drive. Have you ever struggled with formatting a large drive? Third-party tools can make this process seamless. By following these advanced tips, you can make sure your USB drive is formatted exactly the way you need it.
Credit: www.easeus.com
Frequently Asked Questions
How Do You Format A Usb Drive As Fat32 Or Exfat?
To format a USB drive as FAT32 or exFAT, insert the drive, right-click it in File Explorer, and select “Format. ” Choose either FAT32 or exFAT from the file system dropdown menu, then click “Start. “
How To Change Usb Exfat To Fat32 Without Formatting?
You cannot change exFAT to FAT32 without formatting. Backup your data, then format the USB to FAT32.
How Do I Know If My Usb Is Fat32 Or Exfat?
Right-click the USB drive in File Explorer. Select ‘Properties’. Check the ‘File System’ under the ‘General’ tab.
Can I Convert Fat32 To Exfat Without Formatting?
No, you cannot convert FAT32 to exFAT without formatting. Backup your data and reformat the drive.
Conclusion
Formatting your USB drive as FAT32 or exFAT is straightforward. Both file systems have their pros and cons. FAT32 offers broad compatibility. ExFAT supports larger files. Choose based on your needs. Follow the steps mentioned. Your USB drive will be ready in no time.
Happy formatting!
“I’m someone who loves trying out all the newest tech gadgets! I spend a lot of time testing things like phones, tablets, and computers & accessories. I look at everything carefully and tell you exactly what I think, good or bad. I’ve been doing this for a long time, so I know a lot about how these things work. I want to help you decide if a gadget is really worth your money!”
