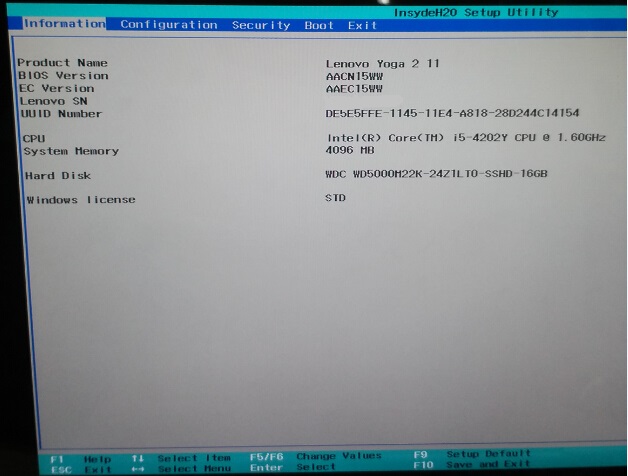
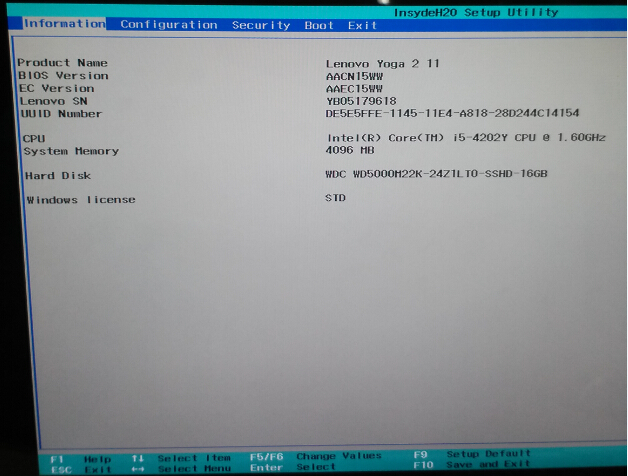
To enter the setup on a Lenovo laptop, press the F2 key during startup. This key gives you access to the BIOS or UEFI setup.
Understanding how to enter setup in your Lenovo laptop can be essential for troubleshooting, updating hardware, or changing system settings. The setup menu allows you to control many aspects of your laptop’s hardware and system configuration. Whether you need to change the boot order, adjust the system time, or update drivers, accessing the setup is the first step.
It might seem a bit technical, but with a simple guide, even beginners can navigate it easily. Let’s walk through the steps to get you into the setup menu on your Lenovo laptop.

Credit: support.lenovo.com
Table of Contents
TogglePreparing Your Lenovo Laptop
Before you dive into the setup process of your Lenovo laptop, it’s crucial to ensure that your device is well-prepared. A few simple steps can save you from potential hiccups and make the process smoother and more efficient. Let’s break down these steps to get your Lenovo laptop ready for setup.
Power On The Device
Begin by powering on your Lenovo laptop. Press the power button and wait for the screen to light up. If it’s a new device, you might see the Lenovo logo followed by the initial setup screen.
If your laptop doesn’t turn on, double-check that it’s connected to a power source. Sometimes, new devices come with a drained battery.
Check Battery Level
Once your laptop is powered on, check the battery level. You don’t want your device to shut down in the middle of the setup process. Look at the battery icon on the taskbar, usually found at the bottom right of the screen.
Ensure your laptop has sufficient charge. If the battery is low, plug it into a power outlet. It’s best to keep the laptop charging throughout the setup process to avoid interruptions.
These simple preparatory steps can prevent unnecessary delays and frustrations. Have you ever had your laptop die on you during an important setup? By ensuring a full battery and a powered-on device, you set the stage for a seamless setup process.

Credit: support.lenovo.com
Accessing Bios Settings
Accessing the BIOS settings on your Lenovo laptop is essential. It helps you manage hardware settings, boot order, and system configurations. Whether you need to change the boot sequence or update hardware settings, the BIOS is your go-to place. This guide will walk you through the simple steps to access the BIOS settings on your Lenovo laptop.
Restart Your Laptop
The first step is to restart your Lenovo laptop. Save any open files to prevent data loss. Click on the Start menu and select “Restart” from the power options. Your laptop will begin the restart process.
Press The Setup Key
Once your laptop restarts, press the setup key immediately. For Lenovo laptops, this key is often F2, F10, or Delete. Press the key repeatedly until you see the BIOS setup screen. If you miss the window, restart your laptop and try again.
In the BIOS setup screen, you can navigate using the keyboard. Use the arrow keys to explore different settings. Make sure to save any changes before exiting.
Navigating Bios Menu
Accessing the BIOS menu on a Lenovo laptop is simple. Press the F2 key during startup. This opens the setup screen.
Navigating the BIOS menu on your Lenovo laptop can seem daunting. But with a clear guide, it becomes straightforward. The BIOS menu allows you to manage essential system settings. Here’s how to navigate it effectively.
Keyboard Shortcuts
Keyboard shortcuts are vital for easy navigation. On Lenovo laptops, pressing the F1, F2, or Enter keys can access the BIOS menu. Use the arrow keys to move through options. The Escape key lets you exit menus without saving changes.
Main Menu Options
The main menu in BIOS shows several options. These include System Information, Boot Options, and Configuration Settings. System Information provides details about your laptop’s hardware. Boot Options allow you to change the startup sequence. Configuration Settings let you adjust system settings like date and time.

Credit: www.youtube.com
Changing Boot Order
Have you ever needed to boot your Lenovo laptop from a USB drive or an external DVD? Changing the boot order in your BIOS settings can be the key. This process allows your device to start up from a different source, which can be incredibly useful for installing a new operating system or running a diagnostic tool. Let’s dive into how you can easily change the boot order on your Lenovo laptop.
Select Boot Tab
First, you need to access the BIOS setup utility. To do this, restart your laptop and press the F2 key or Enter key when you see the Lenovo logo. This will bring you to the BIOS menu.
In the BIOS menu, use the arrow keys to navigate. Look for the Boot tab—usually found at the top of the screen. This is where you’ll manage your boot order settings.
Adjust Boot Sequence
Once you’re in the Boot tab, you’ll see a list of devices such as your hard drive, USB drive, and DVD drive. These are listed in the order the laptop will try to boot from them.
To change the boot sequence, use the arrow keys to highlight the device you want to boot from first. Press the + (plus) or – (minus) keys to move it up or down in the list. For instance, if you want to boot from a USB, move it to the top of the list.
After adjusting the order, save your changes by pressing F10 and confirm by selecting Yes. Your laptop will now boot using the new order.
Have you ever tried changing the boot order on your Lenovo laptop? What challenges did you face? Share your experiences and tips in the comments below!
Configuring Security Settings
Access the setup on a Lenovo laptop by pressing the F2 key during startup. This allows you to configure security settings easily. Make sure to save any changes before exiting.
Configuring Security Settings on your Lenovo laptop is a critical step to safeguard your personal data and enhance overall system security. It ensures that your device is protected from unauthorized access and potential threats. Let’s dive into some essential security settings you can configure in your Lenovo laptop’s BIOS setup.
Set Bios Password
Setting a BIOS password is a straightforward yet effective way to enhance your laptop’s security. This password is required every time you boot up your laptop or access the BIOS setup.
To set a BIOS password, restart your Lenovo laptop and press the appropriate key (usually F2 or Del) to enter the BIOS setup. Navigate to the Security tab. Here, you will find the option to set a Supervisor Password and a User Password. Choose strong, memorable passwords and avoid using easily guessable information like birthdays or common words.
A strong BIOS password ensures that only authorized users can make changes to your BIOS settings. This adds an extra layer of protection against unauthorized access, especially important if you frequently use your laptop in public places.
Enable Secure Boot
Secure Boot is another vital security feature available in the BIOS settings. It ensures that your laptop only boots using trusted software from the manufacturer. Enabling Secure Boot helps protect against malware and ensures that your system remains uncompromised during startup.
To enable Secure Boot, enter the BIOS setup by restarting your Lenovo laptop and pressing the appropriate key (usually F2 or Del). Navigate to the Boot tab and find the Secure Boot option. Set it to Enabled. Save your changes and exit the BIOS.
Enabling Secure Boot ensures that your laptop is protected from malicious software that could tamper with the boot process. It’s a simple yet powerful way to keep your system secure.
By configuring these security settings, you’re taking proactive steps to protect your Lenovo laptop. Have you ever had an incident where these settings could have made a difference? Share your experiences or concerns, and let’s keep the discussion going.
Saving And Exiting Bios
Access BIOS on a Lenovo laptop by pressing the F1 key during startup. Save changes and exit by pressing F10. Make sure to confirm the changes to keep your settings.
Entering the BIOS on a Lenovo laptop is essential for system settings. After making changes, saving and exiting BIOS is crucial. This ensures your adjustments take effect. Below are steps to save changes and exit BIOS.
Save Changes
After modifying settings, navigate to the “Save Changes” option. Use the arrow keys to highlight this option. Press “Enter” to select it. Confirm your choice by pressing “Yes” or “Y”. This stores your new settings.
Exit Bios
To exit BIOS, find the “Exit” option. Highlight it using the arrow keys. Press “Enter” to select “Exit”. Confirm the exit by pressing “Yes” or “Y”. Your laptop will restart with the saved settings.
“`
Troubleshooting Common Issues
Entering the setup in your Lenovo laptop can sometimes be tricky, especially when you encounter common issues. Troubleshooting these problems is crucial to ensure your device runs smoothly. Let’s dive into some common issues you might face and how to resolve them.
Bios Key Not Working
If pressing the BIOS key doesn’t work, don’t panic. This issue is more common than you might think.
First, check if you’re pressing the correct key. Typically, it’s F1, F2, or DEL for Lenovo laptops. Refer to your user manual for confirmation.
Timing is everything. Press the BIOS key as soon as you start the laptop. Missing the window can lead to this problem.
Still not working? Try a different keyboard. A faulty keyboard can be the culprit. If an external keyboard works, you might need to replace your laptop’s keyboard.
Restoring Default Settings
Sometimes, resetting your BIOS settings to default can resolve issues. It’s a simple yet effective solution.
To restore default settings, enter the BIOS setup. Look for an option like “Load Setup Defaults” or “Reset to Default”. This option is often found under the “Exit” tab.
Save the changes and exit. Your laptop will reboot with default settings. This can fix various configuration issues.
Restoring default settings can feel like hitting the reset button on your laptop. It’s a good practice if you’re unsure about the changes you’ve made.
Have you ever faced these issues with your Lenovo laptop? How did you resolve them? Share your experiences in the comments below!
Frequently Asked Questions
How Do I Get To The Setup Menu On A Lenovo?
To access the setup menu on a Lenovo, restart your computer. Press the “F2” key repeatedly during startup. This will open the BIOS setup menu.
What Is The Setup Key For Lenovo Laptop?
The setup key for a Lenovo laptop is usually F1, F2, or the Novo button. Check your model’s manual for specifics.
How To Enter Lenovo Setup Utility?
To enter Lenovo Setup Utility, restart your Lenovo laptop and press F2 or Enter repeatedly during startup. Access BIOS settings.
How Do I Open Lenovo Boot Setup?
Press the “F2” key repeatedly as soon as the Lenovo logo appears during startup to open the boot setup.
Conclusion
Accessing the setup in your Lenovo laptop is simple. Just follow the steps mentioned. Restart your laptop and press the designated key. Usually, it’s F1, F2, or Del. Enter the BIOS menu and make necessary changes. Save your settings before exiting.
This process helps you adjust important system configurations. Now you know how to manage your Lenovo laptop’s setup easily. Practice these steps to become more comfortable. Happy computing!
“I’m someone who loves trying out all the newest tech gadgets! I spend a lot of time testing things like phones, tablets, and computers & accessories. I look at everything carefully and tell you exactly what I think, good or bad. I’ve been doing this for a long time, so I know a lot about how these things work. I want to help you decide if a gadget is really worth your money!”
